
Case Report
A Case of Full Upper Arch Implant Placement Using a Surgical Guide: A Step-by-Step Protocol with 2-Year Follow-Up
1Faculty of Dental Medicine, Lebanese University, Beirut, Lebanon.
2Department of Oral Medicine and Maxillofacial Radiology, Faculty of Dental Medicine, Lebanese University, Beirut, Lebanon.
*Corresponding Author: Ibrahim Nasseh, Department of Oral Medicine and Maxillofacial Radiology, Faculty of Dental Medicine, Lebanese University, Beirut, Lebanon.
Citation: Haidar N, Haouili F, Nasseh I. (2026). A Case of Full Upper Arch Implant Placement Using a Surgical Guide: A Step-by-Step Protocol with 2-Year Follow-Up. Dentistry and Oral Health Care, BioRes Scientia Publishers. 5(1):1-11. DOI: 10.59657/2993-0863.brs.26.058
Copyright: © 2026 Ibrahim Nasseh, this is an open-access article distributed under the terms of the Creative Commons Attribution License, which permits unrestricted use, distribution, and reproduction in any medium, provided the original author and source are credited.
Received: December 03, 2025 | Accepted: January 05, 2026 | Published: February 06, 2026
Abstract
Full mouth rehabilitation presents multiple challenges, including surgical planning and prosthesis design. A digital approach can help increase surgical precision and improve long-term prognosis. The aim of this case report is to describe, step-by-step, the treatment plan of a 71-year-old woman from the first consultation to final prosthesis with a 2-years follow-up: extraction of root tips and failed implants in the maxilla followed by removal of a nasopalatine duct cyst, preparation of complete upper denture that will serve as a duplicate for the radiographic guide placement of seven implants, flapless surgery, using the surgical guide with immediate temporization then final crowns. With the assistance of a computerized simulation to guide the surgical approach, approximately 98% accuracy in implant placement is possible; however, in our case, the guide was moved slightly buccally; however, this had no effect on the overall planning or the definitive crowns, and the patient was very pleased with the outcome after two years.
Keywords: surgical planning; full mouth rehabilitation; digital approach; nasopalatine duct cyst; radiologic guide; surgical guide; flapless surgery
Introduction
Impaired mastication is a significant complication of edentulism. Even with high-quality complete dentures, masticatory function varies between one-fifth and thirty percent of dentate patients. Aside from mastication, long-term denture wear may cause significant psychological and social burden for certains patients [1].
In recent decades, implant-supported full-arch rehabilitation have become known as a reliable and predictable therapeutic option for edentulism [2]. Modern guided surgery technologies offer an ideal approach for implant placement, ensuring proper prosthetic alignment while minimizing intraoperative trauma and reducing operative time [3].
This case report describes, step-by-step, the treatment plan of a 71-year-old female patient, from the initial consultation to delivery of the definitive prosthesis, with a 2-years follow-up. The treatment included removal of failed implants in the maxilla, excision of a nasopalatine duct cyst, fabrication of a complete upper denture to serve as a duplicate for the radiographic guide, placement of seven implants using a flapless, guided surgical approach, immediate temporization, and delivery of the final crowns.
The aim of the clinical report presented is to describe a series of minimally invasive treatment procedures for predictable placement and restoration of full upper arch using a surgical guide.
Case Presentation
Patient Description
A healthy, non-smoker, 71-year-old female patient presented at our office complaining of chewing discomfort and dental implant failure. The patient approved of the dental implant therapy, and there were no medical contraindications.
Clinical examination on the upper jaw indicated that she was missing all her teeth, a localized gingival enlargement on the anterior region, an unevenly resorbed upper ridge, an implant with no cover screw, root tip on 13, and an implant head could be seen in the gingiva area of 16 (Figure 1).
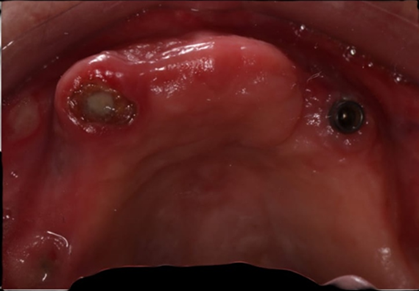
Figure 1: Clinical situation of the upper jaw at the initial consultation.
A panoramic radiograph showed a tilted implant in region of 16 with radiolucency surrounding the implant, a fractured implant in region 14, a root tip of 13 endodontic treated without apical response and implant on 23 with considerable radiolucency around it.
On the lower jaw, her right and left molars were absent, as well as anterior lower teeth, and she had 33 and 43 prepared without provisional. Two implants were placed in regions 36 and 46 (Figure 2).

Figure 2: Preoperative panoramic radiograph.
A CBCT scan was requested to obtain a more complete evaluation of the implant location and bone quality and quantity [4].
- Study of the CBCT: Implant on 16 with radiolucency (huge defect) surrounding the implant.
- Fractured implant at the region of 14.
- A root tip of 13 endodontic treated without apical response and implant 23 with considerable radiolucency around it.
- Lack of height and width of bone on the left side.
Treatment Plan
After careful study of the scan, we proposed the following treatment plan for the patient:
- Removal of failed implants and tooth at the upper jaw
- Provisional removable upper denture
- Duplication of the denture to radiological guide
- CBCT of the patient wearing the appliance
- Virtual planning of the case
- Removal of nasopalatine duct cyst
- Fabrication of surgical guide
- Surgery
- Follow-up after 3 months - Impression and crowns
Step 1: Removal of Failed Implants at The Upper Jaw
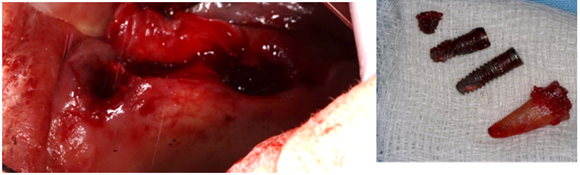
Figure 3: Extraction of failed implants and roots.
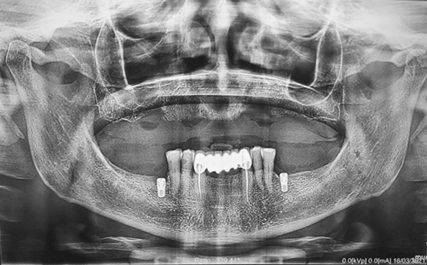
Figure 4: Panoramic after removing failed implants and roots.
A decision was made to proceed with a prosthetically driven surgery, which presents the following advantages:
- For the clinician for planning the study, avoid bone grafting, to choose the optimal implant positioning to be sure that will be transferred exactly in the same place on the mouth and facilitate immediate loading;
- For the patient, to reduce trauma during surgery by minimizing incisions and sutures or flapless surgery, which speeds up the procedure and makes the post-operative period more comfortable [5].
Step 2: Provisional Removal Upper Denture
Conventional dentures are still needed to help patients transition from dentures to implant-retained prostheses.
It is used to provide the correct lip support, indicate future incisal edge positions, the occlusal plate, and the vertical dimension and to predict the shape of the tooth [6].
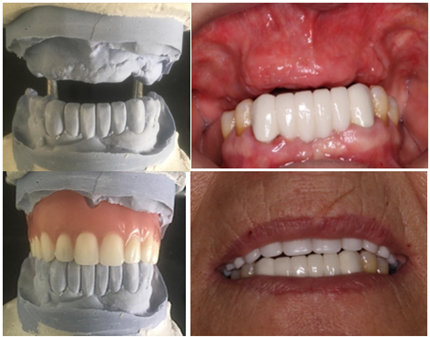
Figure 5: Fabrication of upper denture.
Step 3: Transition from Denture to Radiographic Guide
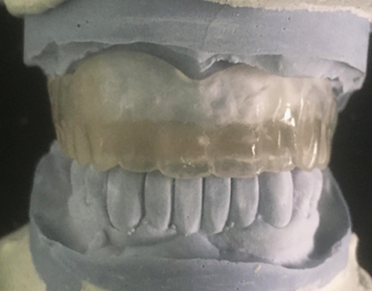
Figure 6: Denture duplicate in clear acrylic.
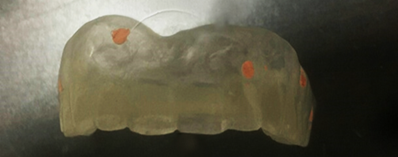
Figure 7: Gutta percha in specific positions.
Step 4: CBCT of The Patient with The Radiographic Guide
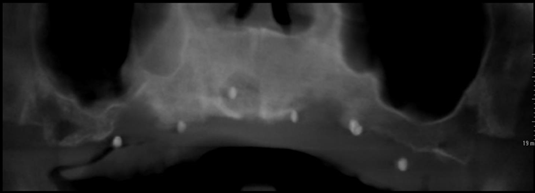
Figure 8: Panorex of the patient wearing the appliance.
Insufficient bone height on 16 and 28, Insufficient bone width on 14 and 24.
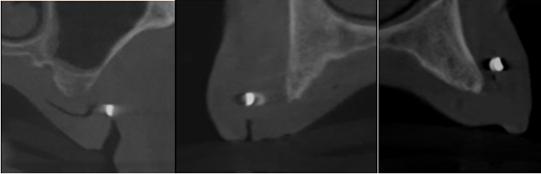
Figure 9: Cross sectional cuts at location 16 -14 -11.
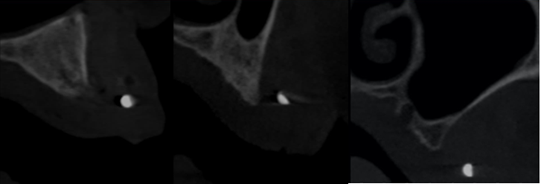
Figure 10: Paraaxial cuts of region 22-24-28.
A well-defined unilocular radiolucent image in maxillary anterior region: Nasopalatine duct cyst (Figure 11).
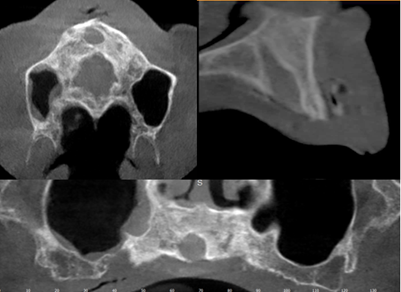
Figure 11: Nasopalatine duct cyst.
Step 5: Planning
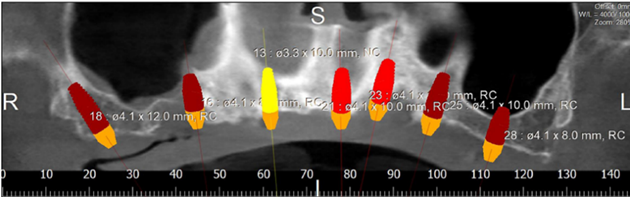
Figure 12: Panorex showing placement of 7 implants.
We chose the placement of 7 implants type Straumann without immediate loading (Figure 12). The type of the surgical guide is mucosa soft tissue supported with fixation by pins. A Flapless surgery without Bone regeneration, and a sinus Graft on 28.
Step 6: Removal of Nasopalatine Duct Cyst
Nasopalatine duct cyst (NPDC) is a non-odontogenic, developing epithelial cyst that represents 1% of all maxillary cysts. It is commonly caused by the spontaneous growth of epithelial tissue remains; however, trauma, bacterial infection, and mucus retention can also cause proliferation. Due to its slow growth and asymptomatic character, the cyst is frequently discovered by accident during routine clinical and radiographic tests [7].
Recurrence is rare, occurring in 0-11% of cases, according to reports. Following surgery, full reconstruction of the bones within the bony defect is expected (8). The intra-oral assessment showed diffuse non-tender isolated swelling in the anterior mid-palatal region (Figure 13). Radiographically, it presents as a well-defined oval or round radiolucency in the maxillary anterior tooth region (Figure 14).
The treatment is done by complete enucleation of the cyst via palatal approach under local anesthesia. Palatal incision was performed and detachment of palatal mucosa in the region between the right and left canines approximately. Dissection was performed between the cystic capsule and the adherent mucosa, followed by cyst enucleation and cleaning of the cavity. The flap was sutured with 3/0 silk.
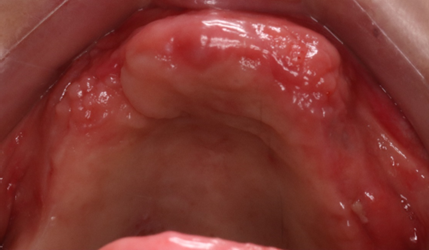
Figure 13: Occlusal view of the maxilla.
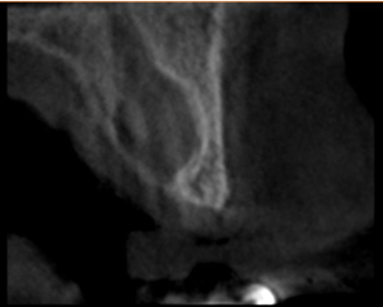
Figure 14: Paraxial cut of the cyst.
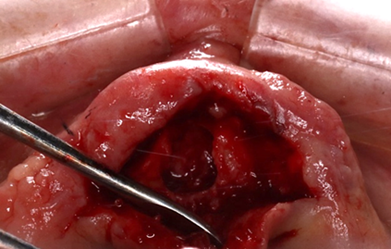
Figure 15: Incision and removal of the cyst.
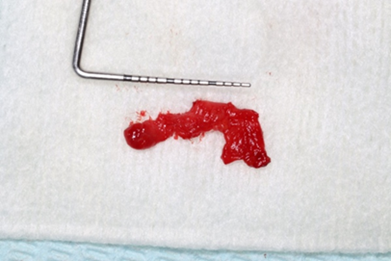
Figure 16: Size of the cyst.
Step 7: Production of the Printed Surgical Guide
In our case, we did indirect digital impressions by using a desktop scanner to convert a Vinyl Polysiloxane Impression Materials impression or a model into a digital impression. Once the maxillary, mandibular, and bite scan files (digital impressions) are ready, export and save them in the highest resolution on the computer in STL format.
Surgical Guide Design
Designing the Surgical Guide is the second step in this workflow. Designing can be done either by using an outside provider, or it may be done in-house by the dentist.
Surgical Guide Fabrication
The appliance can be printed as soon as its design is complete.
Assembly and Sterilization
This stage involves ensuring that the surgical guide is polished, the sleeve is correctly fitted onto the surgical guide, and the surgical guide is completely sterilized.
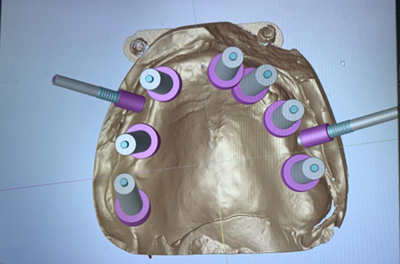
Figure 17: Guide in progress.
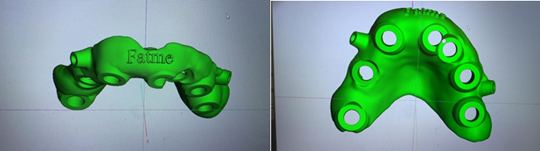
Figure 18: Guide ready to print.
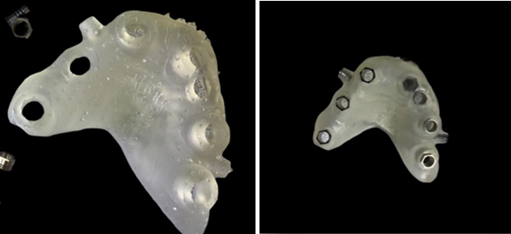
Figure 19: Guide printed with the sleeves and fixations pins placed.
Step 8: Surgery
To make sure the printed guide fit precisely, a thorough evaluation was done before the surgery (Figure 20).
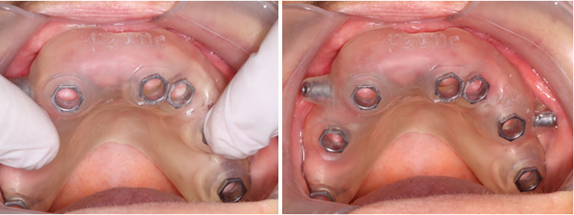
Figure 20: Adaptation of the guide in the mouth.
A local anesthetic was given, consisting of 2% lidocaine and 1:100k epinephrine. And fixation pins were drilled and inserted (Figure 21).
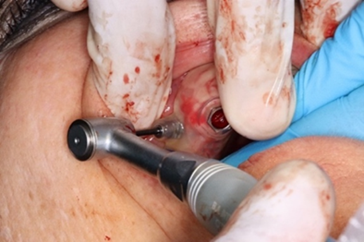
Figure 21: Insertion of fixation pins.
Then atraumatic excision of soft tissue at the surgical site by tissue punch on the 7 holes (Figure 22).
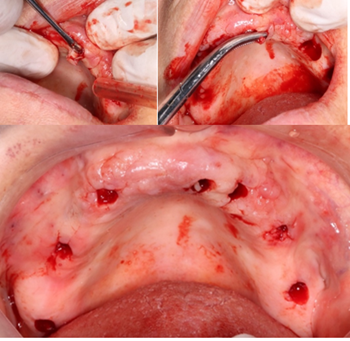
Figure 22: Tissue punch.
We follow the drilling protocol provided to place the implants with copious irrigation with saline solution and we finish by placement of the healing without sutures (Figure 23).
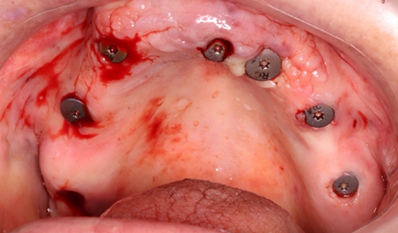
Figure 23: 7 healing screws placed.
We prescribe to the patient antibiotics, painkillers and rinsing the oral cavity twice a day for a week with a 0.2% chlorhexidine mouthwash. We request a panoramic radiograph after the surgery (Figure 24). We have early loss of implant 21 placed in the location previous nasopalatal cyst location.
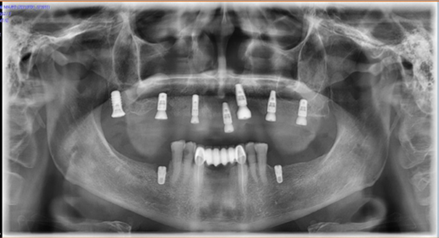
Figure 24: Panoramic radiograph after implants placement.
Step 9- Follow-Up after 3 Months - Impression and Crowns
Three months later, full-arch maxillary impressions were taken using polyvinyl impression material with suitable transfers for an open-tray approach. We splint the transfer with Duralay to reduce errors and record the occlusion using occlusion rims. After evaluating our options, we decided to make a complete cream metallic crown bridge on implants with pink gingiva. First, we check the fit of the metallic infrastructure, and after we try the ceramic bridge and get the opinion of the patient about the color and shape of the teeth. Oral hygiene instructions were provided, and a periodontal supportive therapy was planned every 3-4 months. These photos were taken 2-years after loading, showing stable gingiva and occlusion (Figure 25).
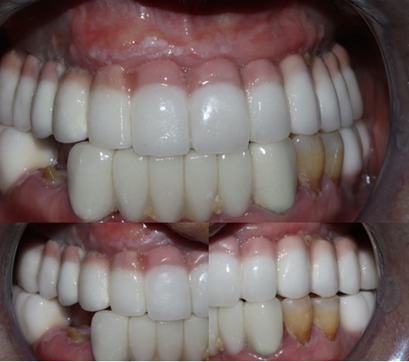
Figure 25: Intraoral photos of the crowns after 2-years.
We notice that the guide was placed more buccally, a complete bone regeneration at the place of the 21 and a slight bone resorption around 23.
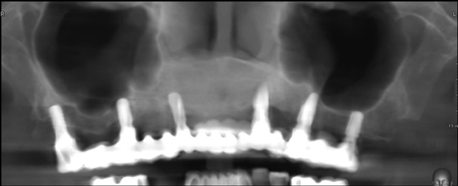
Figure 26: Panorex after 2-years.
Discussion
The main benefit of utilizing the surgical template discussed in this article is that it guarantees accurate, surveyor-guided pilot and surgical drill orientation. Approximately 98 percentage accuracy in implant placement is possible with the assistance of a computerized simulation to guide the surgical approach [9]. But in our case, the guide was moved slightly buccally but it did not affect the overall planning and the definitive crowns and the patient was very satisfied with the result after 2-years. It may be affected by removal of the cyst and reduction of the localized gingival enlargement on the palate. It may be recommended to remove the cyst and let it heal before fabricating the guide.
Surgical templates can be supported by teeth, bone, or mucosa. It is feasible that a solid support by teeth gives the greatest predictability and consequently accuracy. Ozan et al. discovered a mean angular deviation of 2.91° in tooth-supported implants, 4.51° in mucosa-supported templates, and 4.63° in bone-supported templates. The mean coronal and apical deviations showed a similar pattern. Fixation pins can also assist achieve improved accuracy, particularly in non-tooth-supported templates. In any case, proper placing of the template is a crucial condition for success [10].
Takács et al. conducted a recent meta-analysis to establish the accuracy of currently available computer-assisted implant surgery (CAIS) modalities. Fully guided sCAIS produced the most predicted outcomes, whereas freehand sCAIS produced the least accurate results [11]. Patient requirement was a minimal invasive treatment and a fixed crown. Using the surgical guide, we give the patient a well-planned treatment as she requests: accidental discover of the nasopalatal cyst and placement of 7 implants in one day surgery without incision and sutures, reducing the time of surgery and leave the session with her denture with minimum postoperative swollen and pain.
We had an early loss of implant 21, in fact it was expected because it was placed without primary stability. We had a complete bone regeneration at the place of the nasopalatal cyst. The second CBCT showed that the guide was moved slightly buccally but it didn't affect the overall planning and the definitive crowns and the patient are very satisfied with the result after 2-years. González-García and Monje state that CBCT preoperative density value estimation is a reliable method for precisely estimating bone density and by using the color-coded bone density assessment, the dentist can create a customized drilling strategy that will increase the primary stability of the implant like we did in our case, we already know precisely the quality of bone on each site to choose the perfect drilling protocol [12].
Computer-guided surgery permits the clinician to place the implants in their optimal position, both anatomically and prosthetically, minimizing the risk of potential complications [13]. Despite the possibility that guided surgery will require less time for the surgical intervention overall, the preoperative planning process appears to require a significant amount of time. Reduced total treatment costs may result from guided surgery's ability to skip bone grafting treatments. Additionally, a large reduction in treatment duration may help to offset some of the additional expenses and lower overall costs [5].
A number of studies have been released recently that attempt to evaluate the accuracy of digitally guided implant surgery from a scientific standpoint. Two studies assessing the precision of a computer-generated surgical guide by contrasting the three-dimensional locations of planned and inserted implants were released by Cassetta and associates. In the first, they contrasted 116 implants computed tomographic images obtained before and after surgery [14].
They found that there were significant differences in the angulation of the implants as well as the coronal and apical sections of the implants between the preoperative plan and the postoperative position. The scientists concluded that, even if these deviations do not appear to have clinical importance, it is always necessary to maintain a safety zone of at least 2 mm in order to prevent injury to important anatomical structures.
In the other study, they compared pre-operative and post-operative computed tomography (CT) to evaluate the impact of several clinical parameters on the accuracy of the surgical guide and implants implanted in 28 fully edentulous participants [15]. Accuracy was assessed in relation to surgical care of the smoking habit (normal or hyperplastic mucosa), the guide (fixed or unfixed), and the arch (maxilla or mandible). They noticed that the precision of the surgical guides was enhanced in the maxilla due to the larger supporting surface and surgical guide fixation. Additionally, they noted that smoking individuals had higher global coronal and global apical deviations as a result of their thicker mucosa [5].
There are few studies available that address the variables that may cause a difference between the predicted implant location and the actual position reached using surgical guides. The sum of individual errors that may occur in each step of the guide fabrication results in the total variance. If the probable process errors are taken into account and potential deviations are reduced, an accurate, stable, and long-lasting outcome can be obtained [16].
Conclusion
This case report offered a straightforward, reliable treatment plan step-by-step based on CBCT scans, allowing the surgeon to assess whether flapless surgery and immediate temporization are viable therapy options. Most importantly, while guided surgery may require a significant amount of time for planning, radiological studies, and lab preparation, it significantly reduces the time of the surgery, improving recovery time, which our patient greatly appreciated.
Patient Consent
Written informed consent was obtained from the patient for publication of this case report and accompanying clinical and radiographic images.
References
- Abdunabi, A., Morris, M., Nader, S. A., Souza, R. F. D. (2019). Impact of immediately loaded implant-supported maxillary full-arch dental prostheses: a systematic review. Journal of Applied Oral Science, 27:e20180600.
Publisher | Google Scholor - Pera, P., Menini, M., Pesce, P., Bevilacqua, M., Pera, F., et al. (2019). Immediate versus delayed loading of dental implants supporting fixed full-arch maxillary prostheses: a 10-year follow-up report. Int J Prosthodont, 32(1):27-31.
Publisher | Google Scholor - Ashurko, I., Trofimov, A., Tarasenko, S., Mekhtieva, S. (2020). Full‐Mouth Screw‐Retained Implant‐Supported Rehabilitation with Multiunit Abutments Using Virtual Guided Surgery and Digital Prosthetics Protocol. Case Reports in Dentistry, 1:3585169.
Publisher | Google Scholor - Cristache, C. M. (2017). Presurgical cone beam computed tomography bone quality evaluation for predictable immediate implant placement and restoration in esthetic zone. Case Reports in dentistry, 1:1096365.
Publisher | Google Scholor - Colombo, M., Mangano, C., Mijiritsky, E., Krebs, M., Hauschild, U., et al. (2017). Clinical applications and effectiveness of guided implant surgery: a critical review based on randomized controlled trials. BMC Oral Health, 17(1):150.
Publisher | Google Scholor - Karthigeyan, S., Ali, S. A., Mohan, K., Deivanai, M. (2013). An organized start to implant-supported prosthesis. Contemporary Clinical Dentistry, 4(1):90-93.
Publisher | Google Scholor - Hasan, S., Popli, D. B., Ahmad, S. A., Sircar, K., Mansoori, S., et al. (2022). Nasopalatine duct cyst with impacted inverted mesiodens: a rare case report and literature review. Case Reports in Dentistry, 1:5981020.
Publisher | Google Scholor - Nelson, B. L., Linfesty, R. L. (2010). Nasopalatine duct cyst. Head and Neck Pathology, 4(2):121-122.
Publisher | Google Scholor - Soares, M. M., Harari, N. D., Cardoso, E. S., Manso, M. C., Conz, M. B., et al. (2012). An in vitro model to evaluate the accuracy of guided surgery systems. International Journal of Oral & Maxillofacial Implants, 27(4).
Publisher | Google Scholor - Schubert, O., Schweiger, J., Stimmelmayr, M., Nold, E., Güth, J. F. (2019). Digital implant planning and guided implant surgery-workflow and reliability. British Dental Journal, 226(2):101-108.
Publisher | Google Scholor - Takacs, A., Hardi, E., Cavalcante, B. G. N., Szabo, B., Kispelyi, B., et al. (2023). Advancing accuracy in guided implant placement: A comprehensive meta-analysis: Meta-Analysis evaluation of the accuracy of available implant placement Methods. Journal of Dentistry, 139:104748.
Publisher | Google Scholor - González-García, R., Monje, F. (2013). The reliability of cone‐beam computed tomography to assess bone density at dental implant recipient sites: a histomorphometric analysis by micro‐CT. Clinical Oral Implants Research, 24(8):871-879.
Publisher | Google Scholor - Younes, F., Eghbali, A., De Bruyckere, T., Cleymaet, R., Cosyn, J. (2019). A randomized controlled trial on the efficiency of free-handed, pilot-drill guided and fully guided implant surgery in partially edentulous patients. Clinical Oral Implants Research, 30(2):131-138.
Publisher | Google Scholor - Cassetta, M., Stefanelli, L. V., Giansanti, M., Calasso, S. (2012). Accuracy of implant placement with a stereolithographic surgical template. International Journal of Oral & Maxillofacial Implants, 27(3).
Publisher | Google Scholor - Cassetta, M., Giansanti, M., Di Mambro, A., Vito Stefanelli, L. (2014). Accuracy of positioning of implants inserted using a mucosa-supported stereolithographic surgical guide in the edentulous maxilla and mandible. International Journal of Oral & Maxillofacial Implants, 29(5).
Publisher | Google Scholor - Chackartchi, T., Romanos, G. E., Parkanyi, L., Schwarz, F., Sculean, A. (2022). Reducing errors in guided implant surgery to optimize treatment outcomes. Periodontology 2000, 88(1):64-72.
Publisher | Google Scholor